Thursday, July 28, 2011

Cardboard: Better than Toys


Take a close look at this picture. See all the toys on the right? Not nearly as interesting as this cardboard box. There's something fascinating about them, there must be. We have plenty of cardboard in our garage, so I searched out some ideas for cardboard toys. Here are my three favorites:
These first two are from IKatbag. Cute huh?
There is a full tutorial to make this cardboard car on Parents.com

Same kid, different box. Don't his parents ever put clothes on him?

Tuesday, July 26, 2011

Sunglass Case Tutorial


This is a fun little project, and took me only half an hour. It involves sewing only straight lines...perfect! Here's a quick tutorial to make a sunglasses case of your own.

Materials:
-2 strips of fabric, 19" x 4.5"
-small piece of velcro
-sewing machine with thread, scissors

1. Cut two strips of fabric, 4.5" by 19" (more or less depending on size of your shades). In the picture you'll see I cut off the top portion of the material and sewed it on the other strip for a contrasting flap.

2. Sew the strips right side together on three sides. Flip right side out and iron flat.

3. (No pictures...sorry) Fold the main part of the case up and sew on the outside edge of the case, creating a pocket to keep your sunglasses in. For the fourth side that didn't get sewn in step two, I folded the material under and sewed the seam on the outward side.

4. Sew a velcro tab onto the flap and main case to keep it closed. You're done!

Friday, July 22, 2011

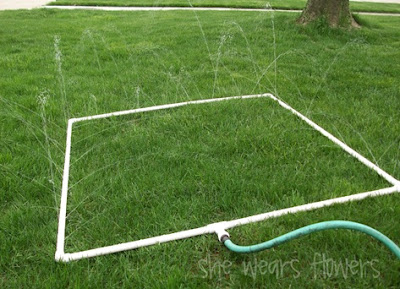
Sprinkler Fun


We love going to the spray park-- water sprinkling and spraying everywhere.
But wouldn't it be fun to bring the spray park to our backyard? Here are some fun sprinkler ideas I spotted on Pinterest:

She Wears Flowers made this PVC Sprinkler


Instructables also used PVC for this "Kidwash"


This Deluxe Kid Wash from Family Fun is amazing. Our little one is probably too young to appreciate all the bells and whistles, but it would look good in our backyard.

All my best,
Robin

Wednesday, July 20, 2011

Grown Up Now

Lori Mckenna is hands-down my favorite singer/songwriter. My one "bucket list" item is to see her in concert. Problem is, she performs small venues mostly on the East Coast. Lori, someday I will make it to a concert! This video is a new song of Lori's, not on a record. I cried a little-- mostly because her voice and lyrics are so awesome. Hope you like!


Tuesday, July 19, 2011

Rick-Rack Rosette Ring


Isn't this ring sweet? I love that it's big and girly and cheap. Cheap in a good way. It's made from medium rick-rack, hot glue, and a ring base (jewelry section at Hobby Lobby). You can get the full tutorial from The Crafting Chicks. The instructions were easy to follow and now I have a new ring to sport around my house while I'm playing toys and cleaning floors. Glamorous, I know. Sometimes I stop mid-sweep to check out this little beauty on my finger.


Have an awesome day,
Robin

Wednesday, July 13, 2011

Upside Down Pizza

Here's a recipe for the impatient ones. It's quick, easy, and requires few ingredients. It's called upside down pizza casserole. It can be modified for picky eaters, but is low maintenance, which I of course like.


You need:
--1 pkg. refrigerated biscuits
--15 oz. can tomato sauce & Italian seasoning or pizza sauce
--1 lb. ground beef or other meat of choice
--mozzarella cheese (as much or little as you like..I used 1.5 cups)
--additional toppings (optional)

1. Preheat oven to 350. Brown hamburger in a skillet, add Italian seasoning.
2. Spread meat in bottom of a 9x13 dish, add toppings and cheese.
3. Flatten biscuits and press them on top of cheese.
4. Bake 20 minutes or until biscuits are golden brown.

Tuesday, July 12, 2011

Take a Seat...on our new bench


My parents had this old bench collecting dust in their basement, and told us we could have it. Free? Yes please. I didn't take a before picture. Use your imagination on this one--it was the same bench with worn off dark stain.

We encourage our guests to remove their shoes, but thought this would make it even easier. You know how awkward it is take off some shoes standing up...or is that just me? The bench also serves as our landing strip, aka throw all the stuff you just drug into the house here. Until company comes. Then it's time to get serious and pick up the crap. Here is the process and finished bench:

1. Sand bench until smooth, paint with spray paint
2.. Print out your last name in a word document using a font you like. I found one at dafont.com.
3. Carefully cut out each letter.
4. Using a Sharpie, trace the letters onto the bench.
*Or you can be efficient and use a stencil or Cricut and combine steps 1-4*

5. Fill in the letters with a few layers of acrylic paint.

6. Spray with lacquer to protect.
I free-handed the little scrolly guys on either side. The bench is nice, but I'm not sure I love it. I'm going to leave it this way for a while, though. Why? Because my mom told me to. I'm sure she had visions of my husband's rolling eyes as I asked him to help repaint it. She's a smart woman. I might add a little basket for our outdoor essentials. You know, because I love watching my little guy dump stuff out and then helping him pick it up.

All my best,
Robin

Thursday, July 7, 2011

Summer Reads


Much of my summer reading has included board books and blogs, magazines and websites. Intriguing, I know. I could tell you all about Elmo's fave color (any coincidence that it's red?) and the latest updates on my favorite bloggers, but that is not nearly as interesting as me suggesting a few books you might like to read.

Here are the three legitimate books I have read so far this summer. The last one, I must admit, I read for a class, but it's an enlightening look at another culture. Hope you enjoy!


If you have any fabulous reads of your own, please tell me in the comment section below. I am always looking for a good book.

All my best,
Robin

Wednesday, July 6, 2011

Cupcake Cones


Here's a twist on the traditional cupcake--put it in a cone. The directions are right on the side of the cone box. Who knew? They were pretty easy to make, but I'll give you my own tips and tricks below.

To make your cupcakes in a cone, you'll need:
-24 cones (found in ice cream aisle)
-cake mix
-frosting, homemade or from a can
-sprinkles

1. Line ice cream cones up in a 9x13 pan so they are all standing up...pack them in tight. Preheat oven to 350.

2. Prepare cake mix and pour into a large Ziploc bag. Cut a hole in the corner for mix to come out, like a frosting bag. Fill cones halfway using this method. If you overfill, you'll have yourself a mess.
3. Bake for 20-25 minutes.
4. Remove from oven and let cool completely. When cooled, frost using the Ziploc bag technique, and sprinkle with decorations.

*We waited to frost until we had transported our cake cones--they tip easily

All my best,
Robin

Friday, July 1, 2011

Chicken Wild Rice Casserole

This recipe is excellent! I found it in Better Homes and Gardens "Fast Fix One Dish Meals." See a trend here? Every recipe in this cookbook has turned out fantastic, so I keep making more. This book was definitely worth the purchase!


Chicken-Wild Rice Casserole

  • 6 oz. pkg. long grain and wild rice mix
  • 3 cups cubed cooked chicken
  • 14.5 oz. can French cut green beans
  • 10.75 oz. can condensed cream of celery soup
  • 8 oz. can sliced water chestnuts drained
  • 1/2 cup mayo
  • 1/2 cup chopped onion
  • 3 Tbsp. sliced almonds
  • 1 tsp. lemon juice
  • 1 cup shredded cheddar cheese


1. Preheat oven to 350. Cook rice mix according to package. Meanwhile in a large bowl combine chicken, green beans, soup, water chestnuts, mayo, onion, almonds, and lemon juice. Stir in cooked rice mix. Transfer to an ungreased rectangular baking dish.
2. Bake for 45 minutes, covered. Sprinkle with cheese and bake uncovered until cheese is melted, about 5 minutes.