Showing posts with label crafts. Show all posts

Tuesday, January 31, 2012

Magnetic Calendar

Sharing with you today the magnetic year-round calendar I crafted up. I had to post on the last day of January, mostly because my pregnancy goal was to make it until at least February. My due date is twenty days away, but each day I show up at work people look astonished to see me...same with my doctor's appointments. Yes, still cruising around with the baby bump. And loving every minute (and day of January).
My mom found the magnetic board at a craft store, but had she not, I was going to use a sheet of steel and vinyl or sharpie the calendar template on. For the date stickers, I did the following:
1. Printed off numbers 1-31
2. Printed off enough letters to spell every month (If you want a copy, comment below and I can email you the document).
3. Made the letters/numbers into stickers with a Xyron sticker maker, stuck them onto small squares of cardstock.
4. Mod-Podged the cardstock onto square tiles.
5. Used E-6000 to adhere a "rare earth" magnet (very strong hold, tiny magnet) on the back of each one.
I wasn't going for perfection here...I like the numbers a little off-kilter. It suits our style. I found some cupcake buttons I'm going to use in place of a number when it's someone's birthday, and will hopefully find some more themed buttons as well for other holidays.

Tuesday, November 8, 2011

Great Gift for the Mama-to-Be

Is this a blog about babies, or about crafting, cooking, and miscellaneous fun? Both, for now. My mom and I have been crafting up lots of good baby goodness so it's only right that I share these. One of Barb's latest creations: a pregnancy calendar for yours truly. She made me one with my first baby, and I missed the daily tidbits and kept losing track of how far along I was (I know, pathetic), so she whipped out a new one.


A pregnancy calendar is a great gift for an expecting girlfriend or relative--think "very long advent calendar that counts up to 40 weeks." Each day has a little piece of information to read. Some are lame, like "Moms may be feeling tired." Really? No way! Others are fun and interesting facts about the baby's development.


To make, Barb downloaded the calendar from Just Mommies, printed it, mounted the paper on to cardstock, added embellishments and a cardstock cover, then bound it all together. If you don't have a binding tool, you could adjust and use metal rings or twine.


Thanks for stopping by!
Robin

Friday, October 14, 2011

Decorative Bean Balls


Barb crafted up these sweet little styro-covered spheres for display in my kitchen. To make, she glued different types of beans and peas onto styrofoam balls. There are a variety of sizes and colors to add a little visual interest. To display, I'll stack them up in a clear jar, and maybe use some as a centerpiece a little later on.

Monday, October 3, 2011

Box o' Cards

At any given moment, I have a stash of 100+ cards for various occasions on hand. This way, when a special event or day sneaks up on me (which is the case 99% of the time) I have a card to put with a gift or drop in the mail. I was storing them all in a shabby old shoe box that was falling apart. Until now.


I need more legit dividers, but these will work until I decide what categories I need. This is currently my most attractive organizer. Slapping fabric on it was way easy--I did it my own hodge-podge style, so it's not perfect, but a big improvement.

Tuesday, August 16, 2011

Canvas Prints Nursery Tour

Back to the nursery tour. Above our little guy's crib hang three whimsical canvases. Made by our good friend Megan, these square canvases were first painted with acrylic paint in three coordinating colors. We found some clip art we liked on the Internet and used those as inspiration. After buying plenty of coordinating paper, we went to work cutting and layering the shapes on to make our owls and tree. Megan used Mod Podge to adhere the paper, though a few bubbles did show up. I replicated this project shortly after and experienced a few air pockets as well, but nothing that can't be smoothed out. The key to keeping these kind of projects looking interesting is lots of layers and variety of colors/patterns. I love these little guys and they will be hanging around our house for a long time.


Tuesday, August 2, 2011

Zipper Flowers

I spent some time with my mom yesterday in her craft room, and these little beauties are the result:

I had purchased a box of zippers and rick rack at a rummage a few months ago. This was the perfect craft for my zippers. I used tutorials from Snips and Spice and Needlework to make the flowers. They are both great tutorials. Of course we modified them to fit our supplies. Have not yet decided what to put the flowers on. Maybe a brooch? A hair clip? Head on over to the tutorials if you'd like to make your own.

Tuesday, July 26, 2011

Sunglass Case Tutorial


This is a fun little project, and took me only half an hour. It involves sewing only straight lines...perfect! Here's a quick tutorial to make a sunglasses case of your own.

Materials:
-2 strips of fabric, 19" x 4.5"
-small piece of velcro
-sewing machine with thread, scissors

1. Cut two strips of fabric, 4.5" by 19" (more or less depending on size of your shades). In the picture you'll see I cut off the top portion of the material and sewed it on the other strip for a contrasting flap.

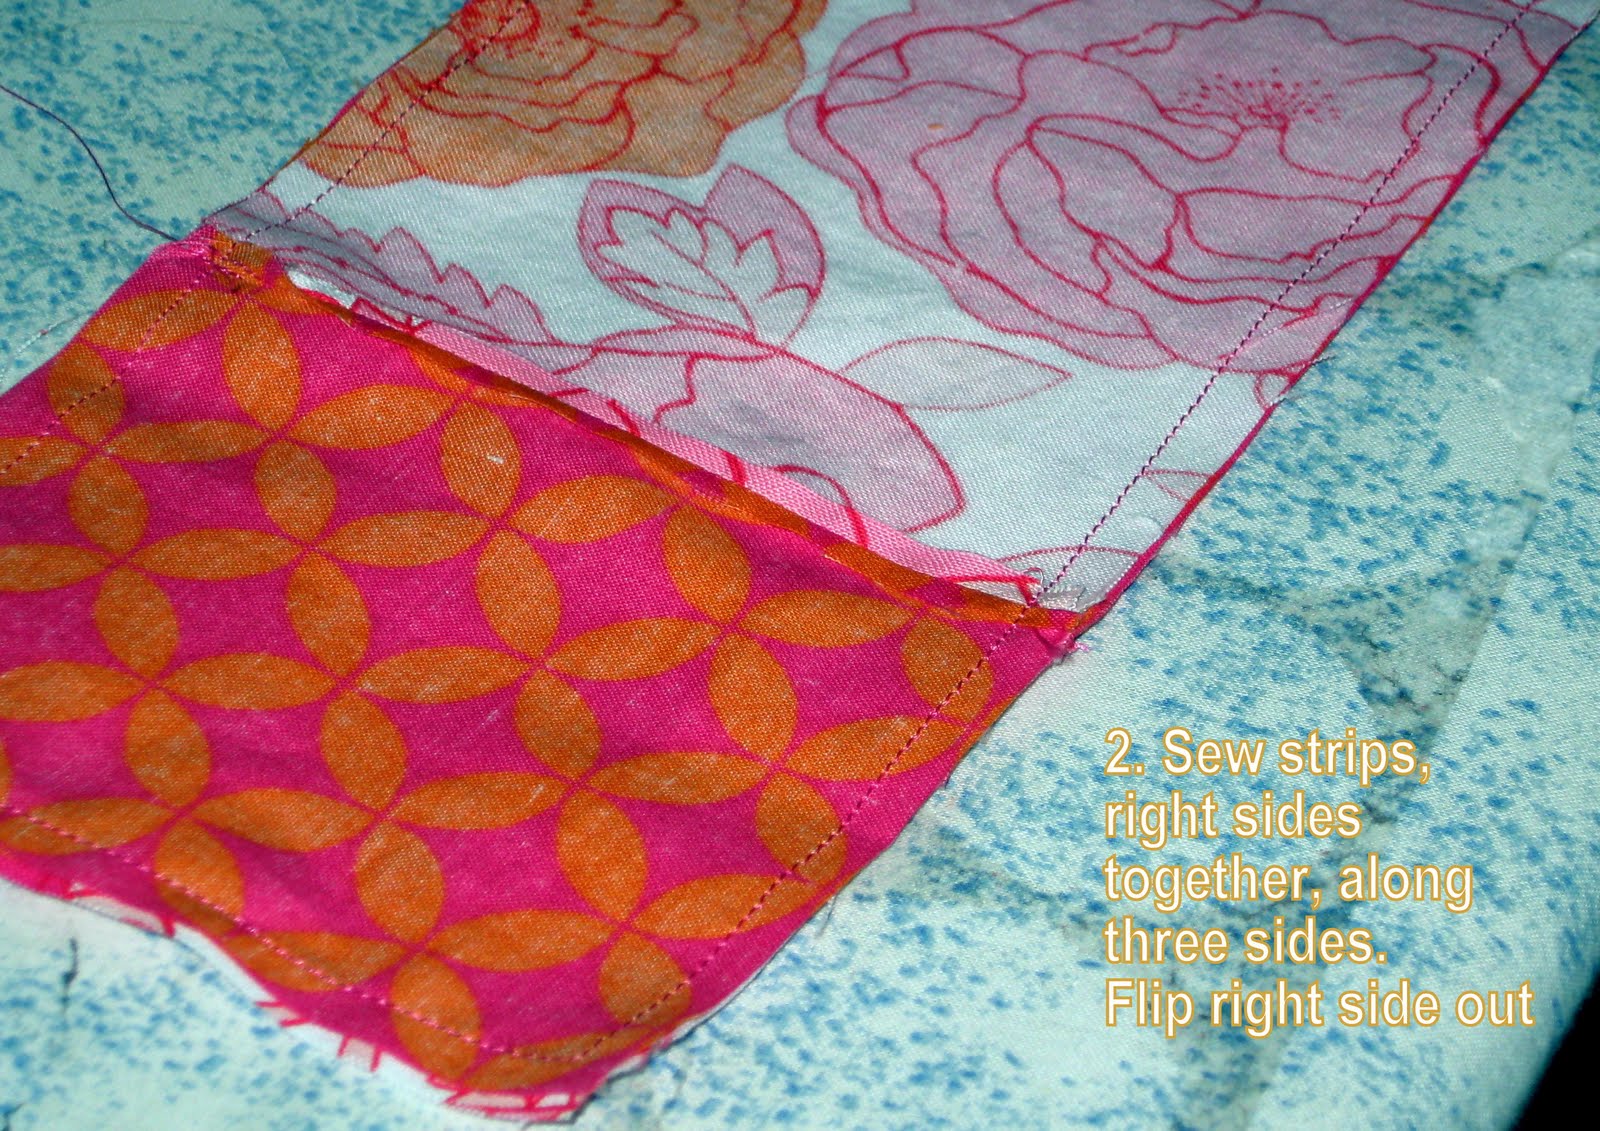
2. Sew the strips right side together on three sides. Flip right side out and iron flat.

3. (No pictures...sorry) Fold the main part of the case up and sew on the outside edge of the case, creating a pocket to keep your sunglasses in. For the fourth side that didn't get sewn in step two, I folded the material under and sewed the seam on the outward side.

4. Sew a velcro tab onto the flap and main case to keep it closed. You're done!

Tuesday, July 19, 2011

Rick-Rack Rosette Ring


Isn't this ring sweet? I love that it's big and girly and cheap. Cheap in a good way. It's made from medium rick-rack, hot glue, and a ring base (jewelry section at Hobby Lobby). You can get the full tutorial from The Crafting Chicks. The instructions were easy to follow and now I have a new ring to sport around my house while I'm playing toys and cleaning floors. Glamorous, I know. Sometimes I stop mid-sweep to check out this little beauty on my finger.


Have an awesome day,
Robin

Tuesday, July 12, 2011

Take a Seat...on our new bench


My parents had this old bench collecting dust in their basement, and told us we could have it. Free? Yes please. I didn't take a before picture. Use your imagination on this one--it was the same bench with worn off dark stain.

We encourage our guests to remove their shoes, but thought this would make it even easier. You know how awkward it is take off some shoes standing up...or is that just me? The bench also serves as our landing strip, aka throw all the stuff you just drug into the house here. Until company comes. Then it's time to get serious and pick up the crap. Here is the process and finished bench:

1. Sand bench until smooth, paint with spray paint
2.. Print out your last name in a word document using a font you like. I found one at dafont.com.
3. Carefully cut out each letter.
4. Using a Sharpie, trace the letters onto the bench.
*Or you can be efficient and use a stencil or Cricut and combine steps 1-4*

5. Fill in the letters with a few layers of acrylic paint.

6. Spray with lacquer to protect.
I free-handed the little scrolly guys on either side. The bench is nice, but I'm not sure I love it. I'm going to leave it this way for a while, though. Why? Because my mom told me to. I'm sure she had visions of my husband's rolling eyes as I asked him to help repaint it. She's a smart woman. I might add a little basket for our outdoor essentials. You know, because I love watching my little guy dump stuff out and then helping him pick it up.

All my best,
Robin

Sunday, June 26, 2011

Sew Your Own Bibs

We have more than twenty bibs, and with the amount of drool going on around here, we still don't ever seem to have a clean one. So, instead of doing my required coursework or tending to my house duties during nap time, I whipped up a few little robot bibs. I am glad I did. How cute are they?

This is a simple project for people like me who aren't so comfortable at the sewing machine, but want to give it a go anyway. If you're a master stitcher, this is gonna be child's play for you...maybe skip to the picture of the cute kid. For the rest of us, here's a short tutorial on how to make a bib.


My mom found this fabric at Hobby Lobby. There are more than 6 different robot guys on the fabric to choose from. To finish the bib, I machine stitched around the edge of the entire bib. This gives it a more polished look and rids the need for hand stitching the hole closed. For the closure, I am going to try a snap, but didn't have any of those on hand. We like velcro too and if the snaps don't work out we'll do that.

All my best,
Robin

Thursday, June 23, 2011

Flower Power to the Rocker

Technically, it's "Good Food Friday." Technically, I've been a terrible blogger. So, rather than share a recipe with you (I have one, just made it this week, and it's awesome), I thought I'd do my best to impress you with a righteous rocker redo I've been working on. Technically not a redo, but a little makeover, if you will.

It started out as shown in the picture above. The rich brown shade is one of my favorites, but after living with it for a while, I started to realize how many neutrals, especially brown, I had going on around this chair. Here's a visual:
Like the random objects placed haphazardly on the piano? It's called "anything breakable gets set on the nearest high object." Too much brown, though. You agree?

I found this decorator fabric at Hobby Lobby and fell in love. I knew it would spruce up the glider. It's been in my drawer for months-- the pattern and colors....yum! To make it, I didn't do anything technical. I basically laid the cushions down and pinned the fabric to fit snugly around them. After machine sewing around three sides, I hand stitched one side and could adjust the fit that way too. I am pleased with the visual interest it adds to the space, and this motivates me to get more house projects done!

All my best,
Robin

Monday, June 13, 2011

ABCs Rock

My kid is obsessed with rocks. He loves to pick them up, throw them, smash them together, drop them....you get the idea. So when I found alphabet rocks at this etsy shop I knew I had to make them. Hers are cute too, so if you'd rather not DIY, check out the shop. Here are the simple steps I followed to create alphabet rock magnets:

1. Find or buy "river rocks" or other fun stones.
2. Using acrylic paint, vary colors and paint one side of each stone. Once dry, outline with a permanent marker.
3. Coat with a spray on lacquer to seal paint and keep from chipping.
4. Adhere small round magnets to the back of each rock using a strong adhesive, such as E6000.


I made a couple extra letters so we could spell out the names of people we love. They could be used for lots of letter/word/color activities or just kept on the fridge for grown-ups to use. We aren't quite over the "put everything in your mouth" stage so we will play rock magnets supervised for now.

All my best,
Robin

Thursday, June 9, 2011

Lamp Love: A Redo

Friday seems as good a day as any to share with you my latest and greatest project. This replaces Good Food Friday today, as there hasn't been much good food around these parts. I've taken a brief sabbatical from cooking and have focused my attention in a hundred other places. One of them, decking out our little home. This lamp redo was inspired by one over at Crafting in the Rain. Hers was so cute I had to do one for our living room. Here is how it went down:
1. I purchased this lamp at a garage sale for $1. Not hideous, but not fabulous either.

2. I purchased a yard of white polka dot fabric. My inspiration shade was white, so I thought it was a good idea. It wasn't. Halfway through, I realized it was looking like it belonged in a young girl's bedroom. But I have pictures of the next step in white anyway: cut into four inch strips. Fold the strip in half and iron it on the fold.


3. Every few inches, fold the fabric over to form a pleat and pin into place. Once you have the length of your fabric pinned, sew across the top (near raw edge) of fabric, making the bottom of the pleat a finished, folded edge. You may need to put two strips together if your shade is large. Iron the pleats down.

4. Hot glue the pleated strips on to the lamp shade, joining at the back and overlapping slightly. I used 2 prints...One I had on hand, the other I found on clearance to replace the white. While this was happening, my husband was graciously spray painting the base for me with paint left over from our silverware hanging.


5. I finished the top by gluing on some white bias tape I had on hand and then adding a little rick rack. It turned out a little whimsical/vintage and fits in with our eclectic decor.

I finished the project in about two hours and for less than five bucks.

All my best,
Robin

Sunday, May 15, 2011

Monsters Aren't All Scary

Holy hiatus from blogging. What's up with that? Life got a little busy, then Blogger got a little buggy. But we're back. With projects and recipes and more craft supplies than time. No kidding on the supplies bit. Between Hobby Lobby, garage sales, and a quick raid of some family members' goods this weekend, I now possess enough craft garb to deck out a small boutique hotel. Or maybe just our split level. I won't even get started on the amount and types of adhesives I couldn't live without. Either way, I am hooked up and ready to get my craft on.

Little progress was made in the way of home decor, but I did get a chance to whip up this little package for a special two year old.
Details: The birthday boy is currently into monsters, so I took my cue from there. Found an uglydoll online...so ugly they're cute. Wanted to make the matching shirt, so I bought a kids' cotton shirt, some felt, and embroidery floss all at the craft store. The felt is cut into similar shapes and sewn on by hand with embroidery floss. You could also machine stitch, but I liked the look of the hand stitch. I used a button for the eye.

The card was impromptu and made using the blank side of another, not-birthday, not-that-cool card I had on hand. I stitched on a matching felt orange eye and then stitched yellow around the edge for a border. Turned out way cuter than I had planned, and was reminiscent of those lacing activity cards I did as a kid.
My own monster model. The drool is not part of the shirt. It is an accessory.
Here is the lucky recipient clutching the monster as he flees gift opening.

I see more custom kids' clothing in my future. Maybe next time with a machine, though. You know, for the instant gratification and all.

I'm guest posting over at My 3 Little Birds today, and have shared this delightful recipe:
Head on over and check it out!


All my best,
Robin